Making regex from scratch in go
03 Starting the compiler
Now we have a working FSM and way to process strings, let’s take a look at building FSMs automatically from regular expressions using a compiler.
Compiling a Finite State Machine
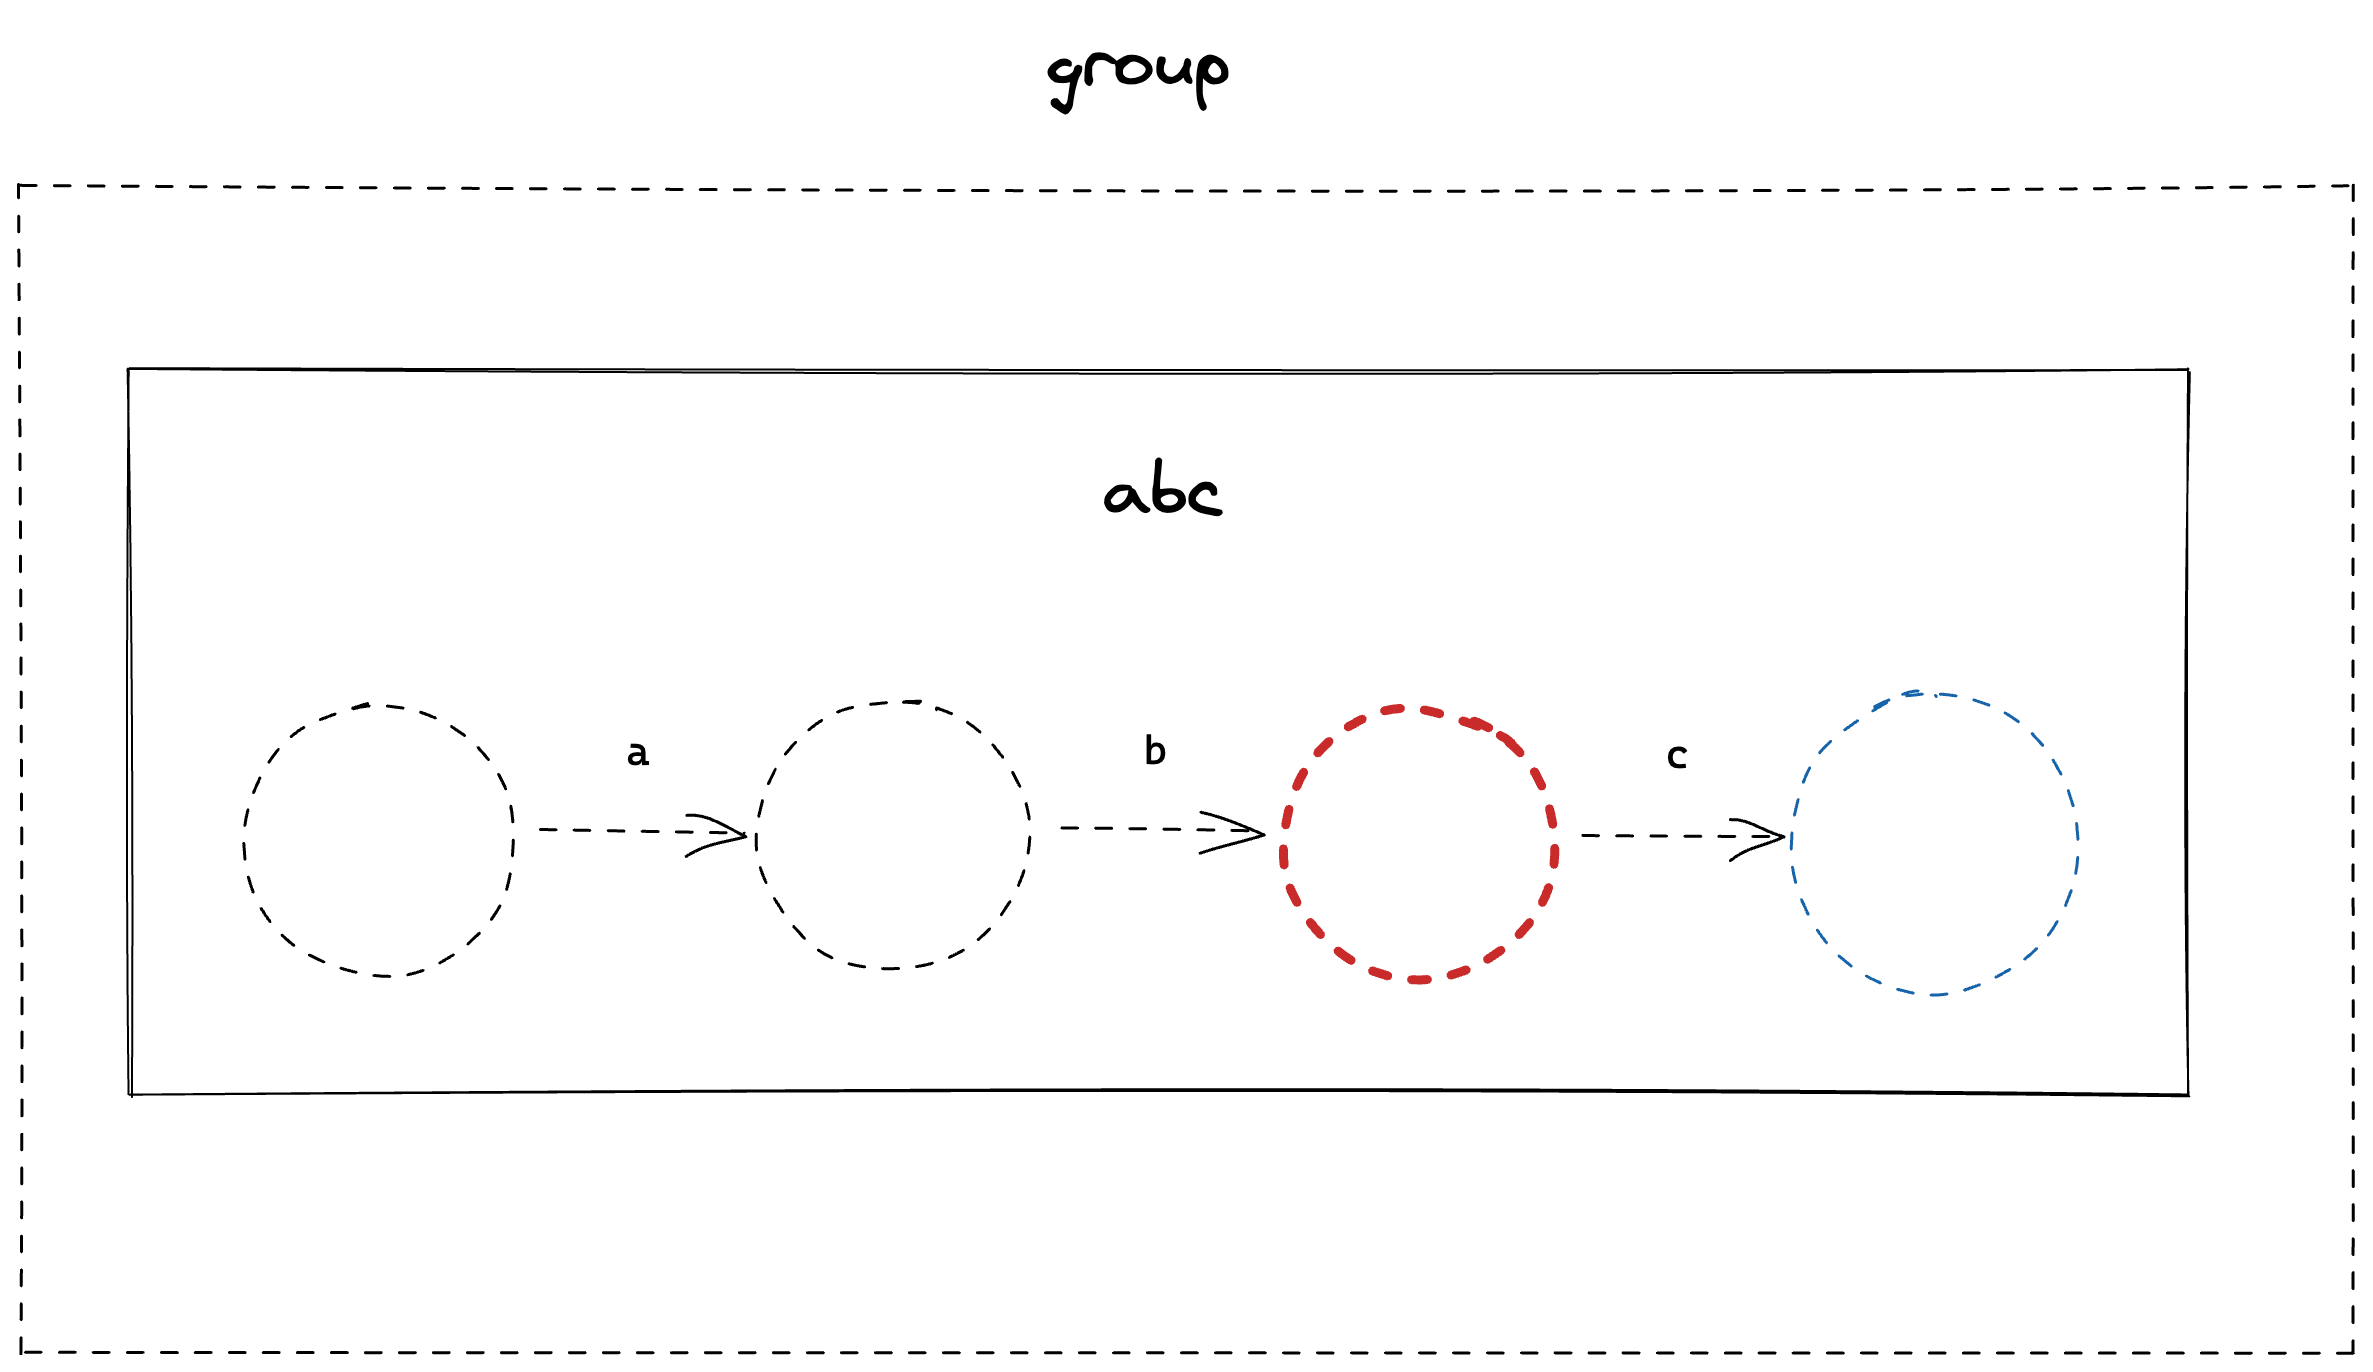
We can break down the previous example of writing an FSM for the regular expression abc into at least 2 discrete steps;
- Take the string
abcand create a linked list of'states'with conditional transitions to other states. - Process the input by moving through the states.
We’ll call these steps compile and evaluate respectively.
So far, we’ve only looked at the evaluate step, where we take an already made FSM and process an input string by moving through its states. Now we’ll look at the compile step.
compile in this context, means turning a string of characters that represent a valid regular expression into a linked list of states; a finite state machine. For this, we will create a Compiler struct with a Compile method which takes a string and returns a *State representing the first State of the FSM, the root or head State.
Let’s do even more decomposition of this problem and break the compilation step into three phases;
- lexing
- parsing
- compiling
Let’s go through these 3 steps in detail.
Lexing
Before we start turning strings into complex abstract objects, it helps to turn them into something a bit easier to work with. In the ‘Lexing’ stage, that’s what we do. We simply convert the different types of characters into tokens which can be more easily interpreted by our program.
Parsing
Once we have our tokens, we want to build something called an ‘Abstract Syntax Tree’ - or an AST for short. The AST is a tree which represents the hierarchical relationship of the regular expression. In other words, in this stage we describe the structure of the expression.
An example of the structure of regular expression (cat) might look like this;
graph TD
0(Group) --> 1[c]
0(Group) --> 2[a]
0(Group) --> 3[t]
This tree shows the relationship between a group (whatever is inside the parenthesis) and the three char literals which make up the expression cat. To simplify things, we’re going to imagine that all regular expressions exist inside a top-level group, so cat is equivalent to (cat).
This hierarchy can become more complicated when things like nested groups or branches are involved. For example, the AST for (ca(r|t)s) looks like this;
graph TD
10(Group) --> 11[c]
10(Group) --> 21[a]
10(Group) --> 31(Group)
31(Group) --> 32(Branch)
32 --> 41[r]
32 --> 42[t]
10(Group) --> 51[s]
The important thing to know about this step is that here we are describing the structure of the expression, and that this structure is recursive. We can isolate any node and process its children, without needing knowledge from elsewhere in the tree. In other words, each subtree can be treated in the same way as the tree, which is very useful in reducing complexity.
Having this structure will make our lives a lot easier in the next step.
Compile
Here, we actually build the States from the AST we created in the previous step.
The end result should be a linked list of States which should represent our regular expression, and a reference to the root State. The way we produce this from our AST is by asking each node to produce an FSM, which will in-turn ask any child nodes to produce an FSM and compose them together, until we reach the leaf nodes - which have no children - and the process ends.
This is where we see the power of recursive structures, as each node must produce an FSM, but nested structures don’t need to know anything about how their children produce FSMs - in fact those children might be nested structures themselves. This is a very powerful and flexible concept, and very useful for what we’re trying to do now.
Now that we’ve described our three phases, let’s jump into some code.
Coding the lexer
In this implementation, we’re going to support a subset of regex special characters;
().*?+|
For simplicity, we’re not going to support escaped characters such as \?. Any character not in the set above is to be considered a character literal.
Let’s define these special characters as symbols.
// lexer.go

type symbol int

const (
	AnyCharacter symbol = iota
	Pipe
	LParen
	RParen
	Character
	ZeroOrMore
	OneOrMore
	ZeroOrOne
)
Notice we also include the symbol character which represents any character which is not a special character.
Using these symbols, we can create a token struct which contains information on the type of symbol, and the character itself, if necessary.
// lexer.go

type token struct {
   symbol symbol
   letter rune
}
Now we simply need to loop through the regular expression string and map the characters to our tokens.
// lexer.go

func lex(input string) []token {
   var tokens []token
   i := 0
   for i < len(input) {
      tokens = append(tokens, lexRune(rune(input[i])))
      i++
   }
   return tokens
}

func lexRune(r rune) token {
   var s token
   switch r {
   case '(':
      s.symbol = LParen
   case ')':
      s.symbol = RParen
   case '.':
      s.symbol = AnyCharacter
   case '|':
      s.symbol = Pipe
   case '*':
      s.symbol = ZeroOrMore
   case '+':
      s.symbol = OneOrMore
   case '?':
      s.symbol = ZeroOrOne
   default:
      s.symbol = Character
      s.letter = r
   }
   return s
}
That’s really all there is to it. Now instead of a string of characters, we have our own defined tokens to work with.
We’ll now use those tokens to build our AST
Coding the parser
For our simple example of parsing the regular expression abc, we just need two types of ASTnode: Group and CharacterLiteral.
Let’s remind ourselves quickly of how these AST nodes relate to each other with our AST diagram.
graph TD
0(Group) --> 1[c]
0(Group) --> 2[a]
0(Group) --> 3[t]
A group contains three child nodes. The child nodes are characterLiterals and are the leaf nodes of the tree.
Let’s create two structs to represent these nodes.
// ast.go

type Group struct {
   ChildNodes []Node
}

type CharacterLiteral struct {
   Character rune
}
We’ll need a way to add child nodes to the Group struct, so let’s add a simple method for that.
// ast.go

func (g *Group) Append(node Node) {
   g.ChildNodes = append(g.ChildNodes, node)
}
And we want all nodes to be compilable, although we’ll get to actually how to compile them a bit later. Let’s use an interface to show that they share this functionality.
// ast.go

type Node interface {
   compile() (head *State, tail *State)
}
And we’ll leave these methods unimplemented for now
// ast.go

func (g *Group) compile() (head *State, tail *State) {
   panic("implement me")
}

func (l CharacterLiteral) compile() (head *State, tail *State) {
   panic("implement me")
}
Finally, let’s use another interface for composite nodes - those with the ability to contain child nodes. This will make things easier when we add other types of composite nodes other than just Group.
// ast.go

type CompositeNode interface {
   Node
   Append(node Node)
}
Ok, now we have our AST nodes defined, let’s take a look at how to parse a string into a tree.
Building the Abstract Syntax Tree
Building the parser is going to be one of the more complex pieces of this project, so it helps to have tests just for this. Let’s start with a simple test to make it clear what we’re trying to produce.
// parser_test.go

func TestParser(t *testing.T) {
   type test struct {
      name, input    string
      expectedResult Node
   }

   tests := []test{
      {name: "simple string", input: "aBc", expectedResult: &Group{
         ChildNodes: []Node{
            CharacterLiteral{Character: 'a'},
            CharacterLiteral{Character: 'B'},
            CharacterLiteral{Character: 'c'},
         },
      }},
   }

   for _, tt := range tests {
      t.Run(tt.name, func(t *testing.T) {
		  tokens := lex(tt.input)
		  p := NewParser(tokens)
		  result := p.Parse()

		 if !reflect.DeepEqual(result, tt.expectedResult) {
			t.Fatalf("Expected:\n%+v\n\nGot:\n%+v\n", tt.expectedResult, result)
         }
      })
   }
}
So, in our simple string test, we’re using as an input the string aBc and we hope to create the following Group struct:
// parser_test.go

&Group{
	ChildNodes: []Node{
		CharacterLiteral{Character: 'a'},
		CharacterLiteral{Character: 'B'},
		CharacterLiteral{Character: 'c'},
	},
}
Parsing such a simple example is very easy - we would simply initialize a new Group, then loop over the characters and append them to the Group. This Group will be our root Node, and will a pointer to it can simply be returned after all the tokens have been processed.
// parser.go

type Parser struct{
   tokens   []token
}

func NewParser(tokens []token) *Parser {
   return &Parser{tokens: tokens}
}

func (p *Parser) Parse() Node {
   root := Group{}

   for _, t := range p.tokens {
      switch t.symbol {
      case Character:
         root.Append(CharacterLiteral{Character: t.letter})
      }
   }

   return &root
As our tests are now green, let’s leave it there and move onto the next step - there’ll be plenty of complexity to dive into later as we introduce nested structures.
Now, turning an AST into a compiled FSM.
Our first compiler
Compiling the AST into State objects can be tricky. The trick to keeping this step simple (and it can very quickly become not simple) is to let each node of the AST decide how it should be compiled.
For our simple example of compiling the regular expression abc, we just need two types of AST node;
CharacterLiteralGroup
We saw these in the diagram above as ‘group’ and ‘char’ boxes. Let’s go through them.
CharacterLiteral
The CharacterLiteral node represents a single character. It does not contain any inner nodes, so it is a leaf node of the AST.
Compiling a CharacterLiteral node is fairly straight forward. A character literal for the expression a should look like this;
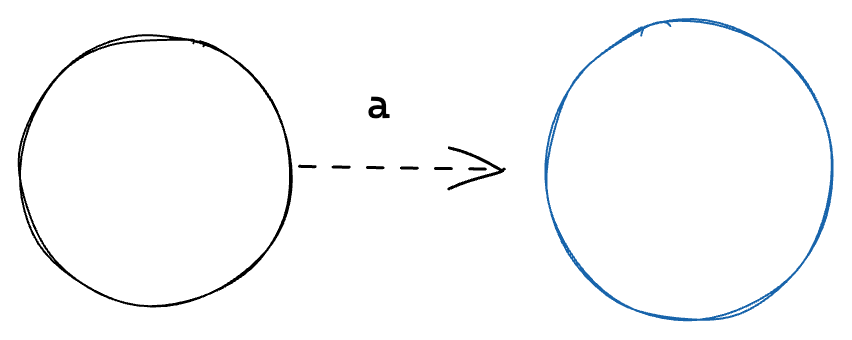
That’s really all there is to it. It’s a two State system with a single transition between them, using the character of the CharacterLiteral as the transition predicate.
Let’s encode this behavior in the Compile method of the CharacterLiteral node object.
// ast.go

func (l CharacterLiteral) compile() (head *State, tail *State) {
	// create the first state
	startingState := State{}

	// create the second state
	endState := State{}

	// add a transition between the two states, using the character as the transition predicate
	startingState.addTransition(&endState, func(input rune) bool { return input == l.Character })

	// return the head and tail states of this FSM
	return &startingState, &endState
}
Group
The Group node represents a collection of AST nodes which need to appear consecutively in the input string. For example, abc would be a Group of 3 CharacterLiteral nodes. The inner nodes of Group do not have to be CharacterLiterals, however. For example, (()()()) would be a Group of 3 Group nodes.
Compiling a Group node is a case of merging together it’s child nodes so that the last state of one child is merged with the first state of the next child.
Let’s look at this visually for our example of abc
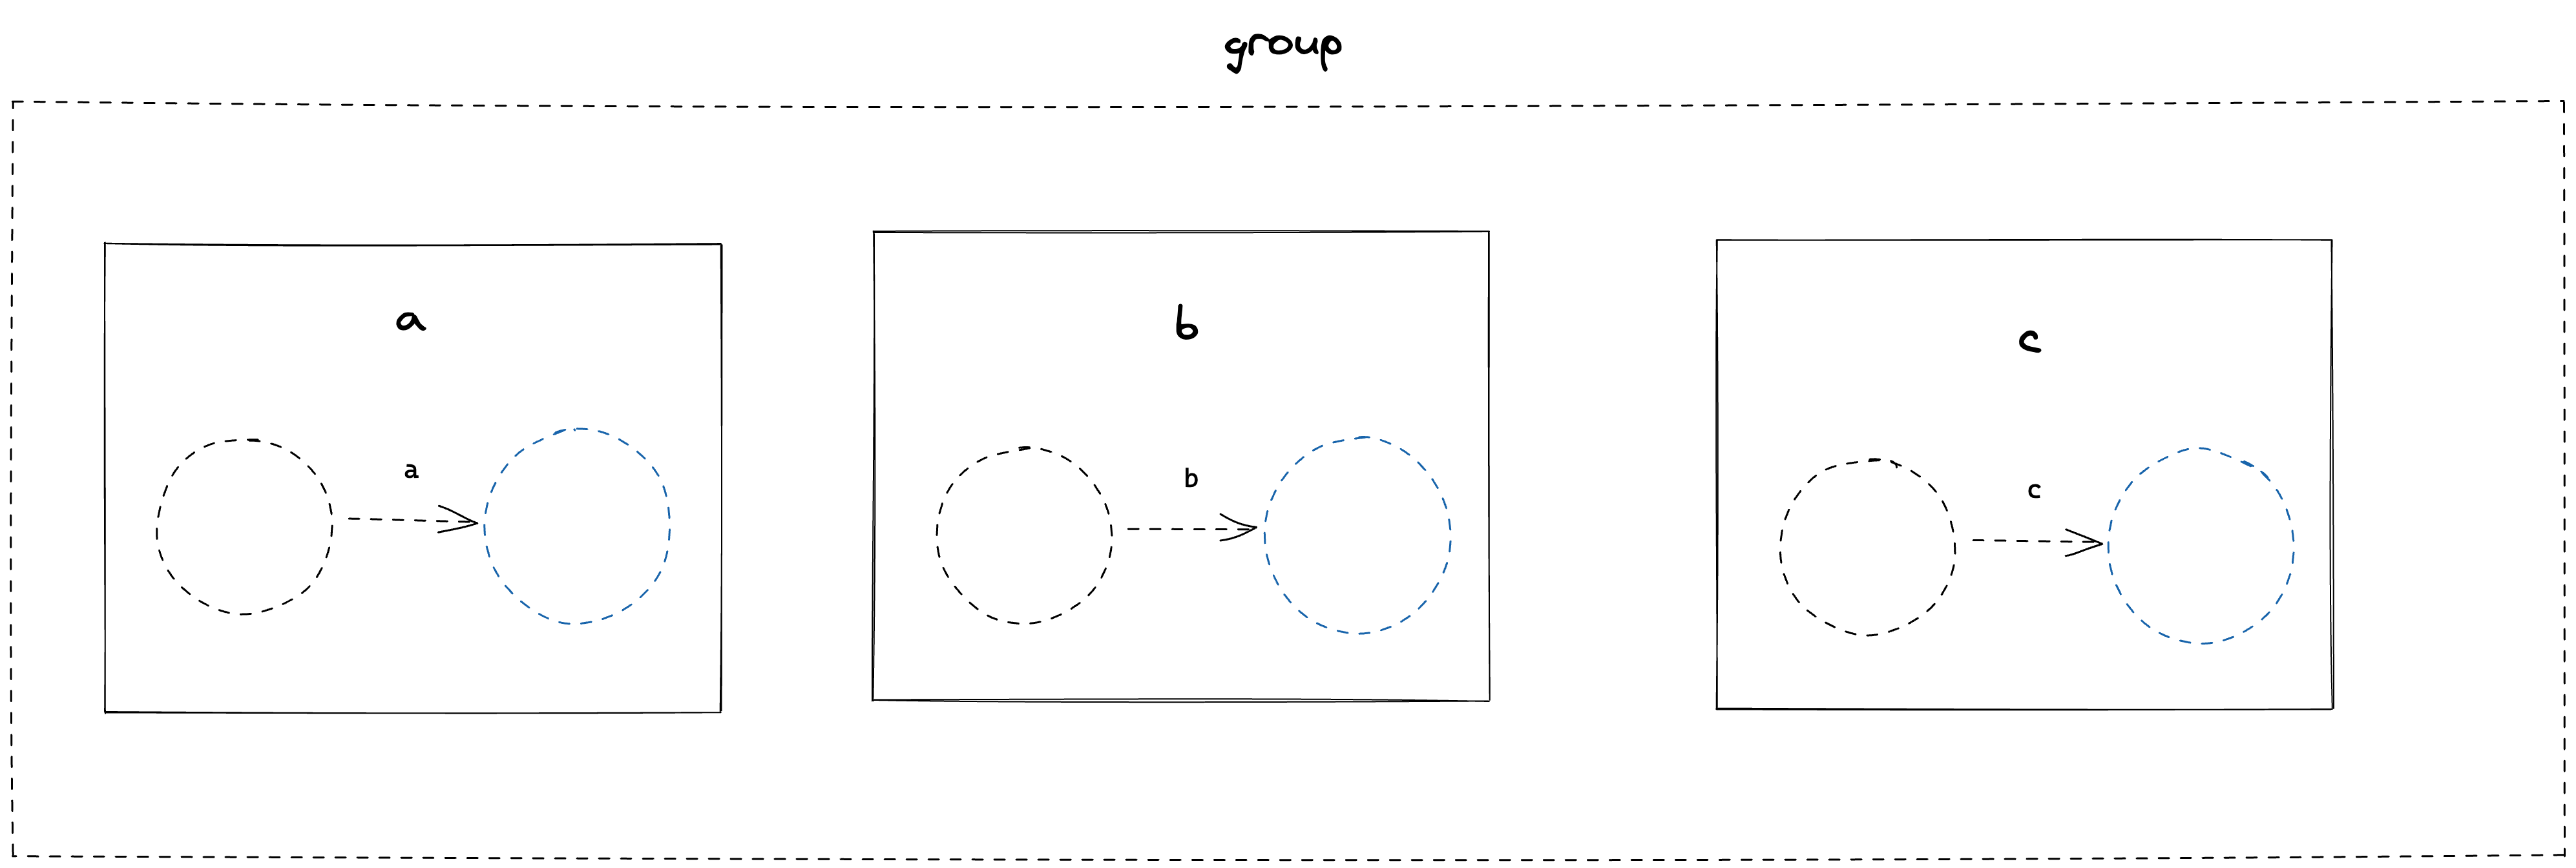
The group contains three characterLiteral nodes, compiled into their two State form. We begin by merging the states from left to right. This means taking the tail of the first FSM and merging it with the head of the second FSM.
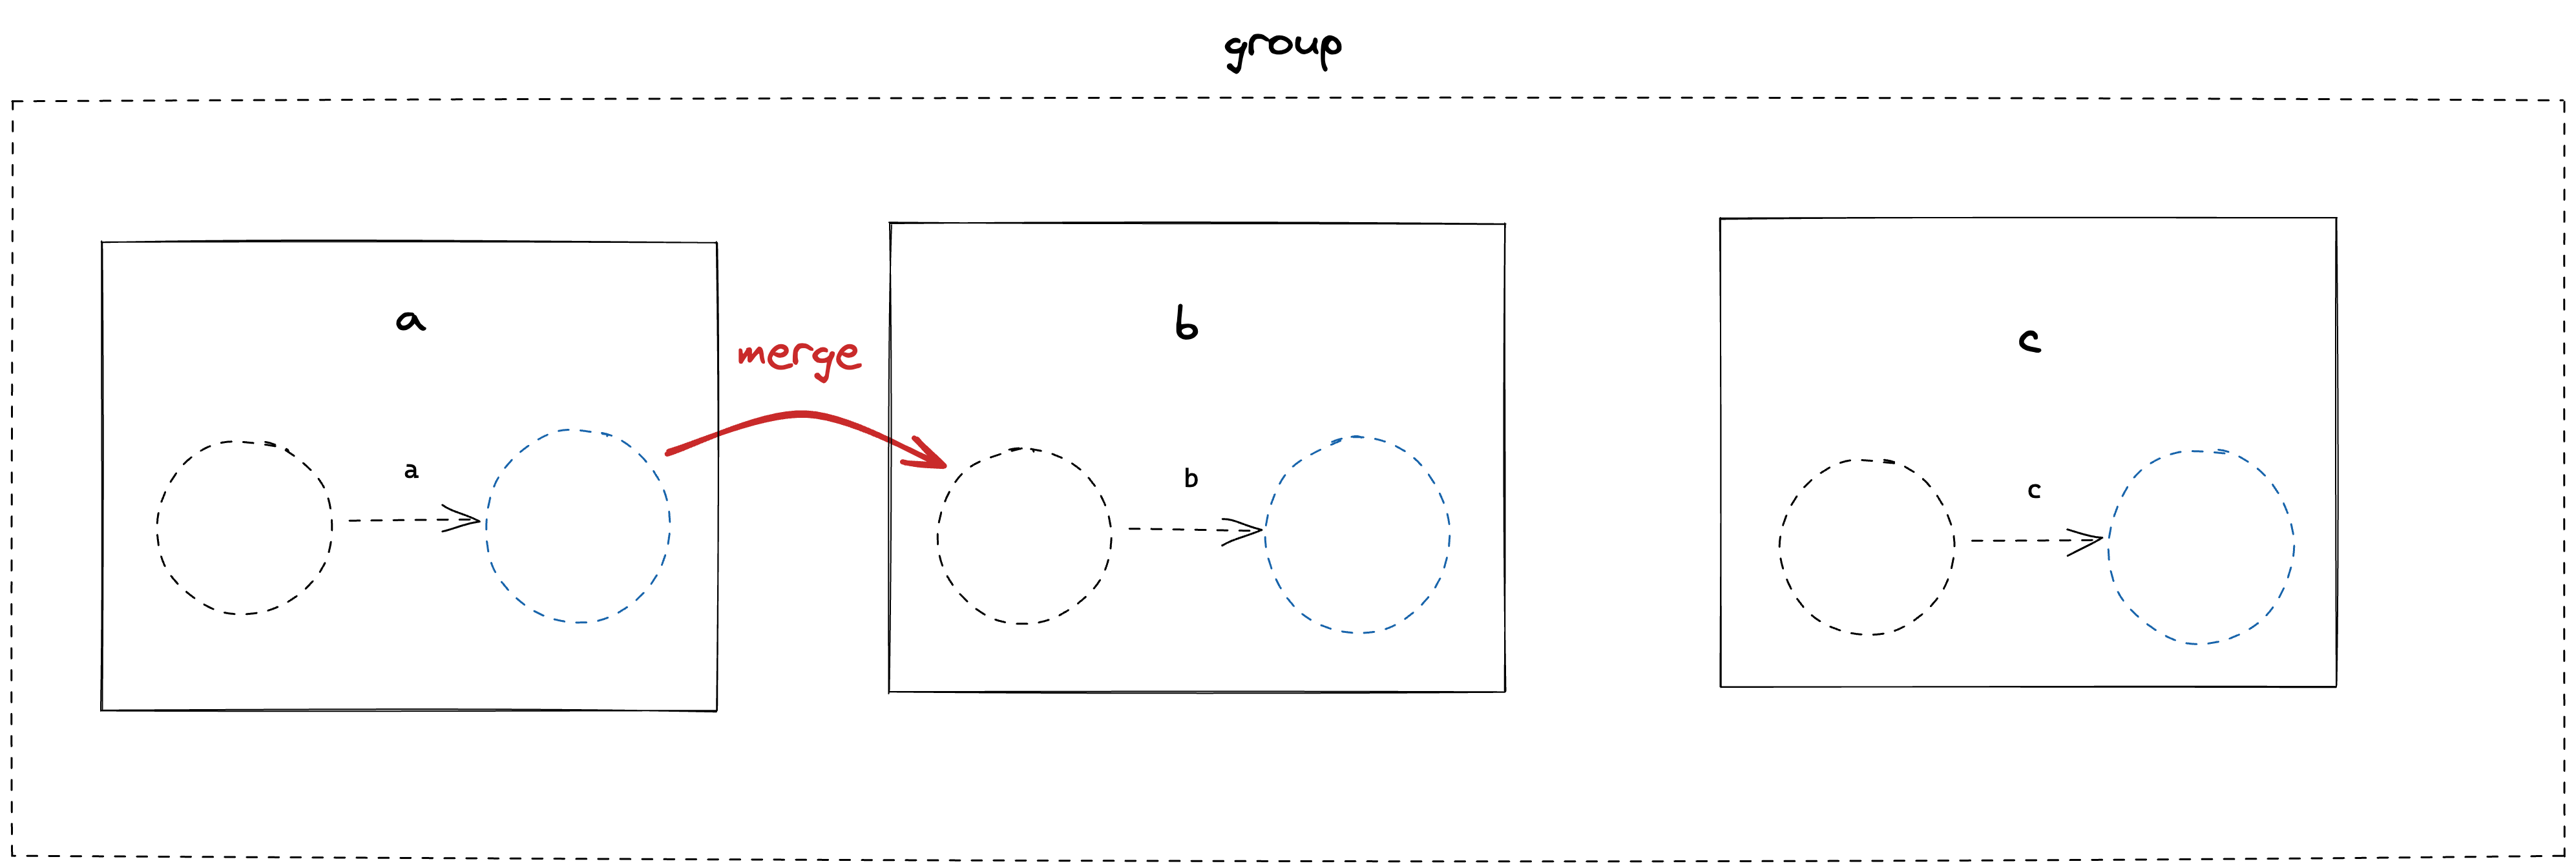
Which leaves us with;

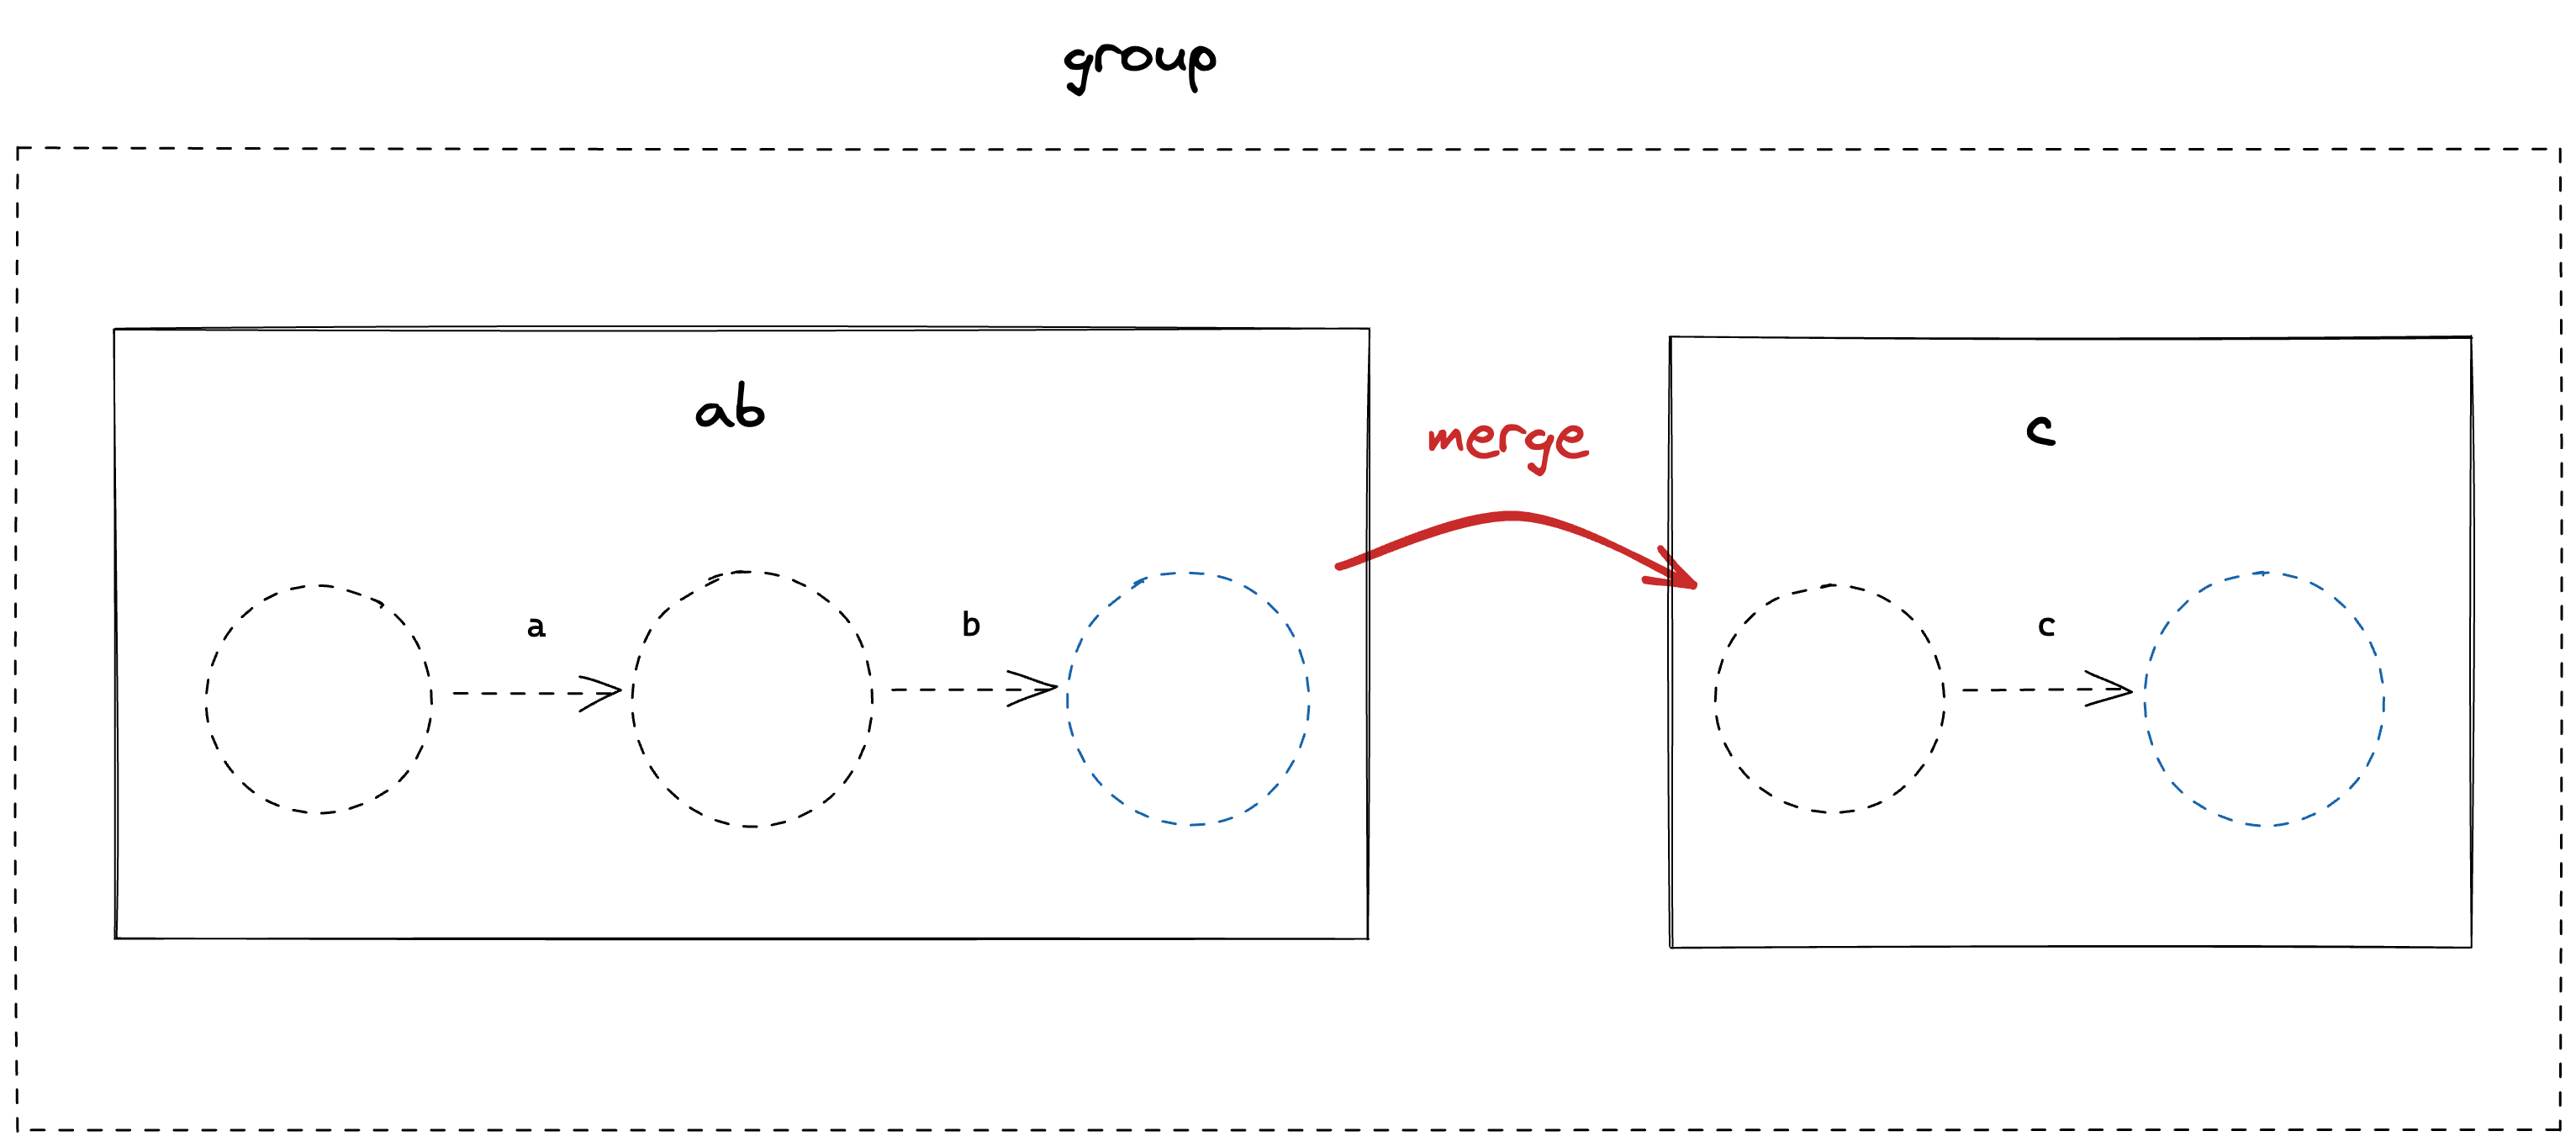
We can repeat this process of merging the tail of the left-most FSM with the head of the second FSM until we are left with a single, compiled FSM.
Let’s add this to the Compile method of the Group struct. This will be a bit more tricky than the CharacterLiteral node.
First, let’s build a starting State for this FSM.
// ast.go

func (g *Group) compile() (head *State, tail *State) {
   startState := State{}
   // [...]
}
Next, we want to loop over the child nodes and do the following;
- compile the child node
- merge the tail of the first node with the head of the second node
- mark the tail of the second node as the new tail
Let’s add a function to the *State struct to handle the merging of one State to another.
// state.go

// adds the transitions of other State (s2) to this State (s).
func (s *State) merge(s2 *State) {
   for _, t := range s2.transitions {
      // 1. copy s2 transitions to s
      s.addTransition(t.to, t.predicate)
   }

   // 2. remove s2
   s2.delete()
}

func (s *State) delete() {
   s.transitions = nil
}
There’s not much to explain here. Merging one State to another simply means applying the transitions from one to the other. We then call delete on the second State, which simply means removing its transitions1.
The third step is important as it tells us which state we need to merge next in the iteration, and allows the FSM to grow to the right, as in the diagrams.
Putting this all together, we have the following Compile function;
// ast.go

func (g *Group) compile() (head *State, tail *State) {
   startState := State{}
   currentTail := &startState

   for _, expression := range g.ChildNodes {
      nextStateHead, nextStateTail := expression.compile()
      currentTail.merge(nextStateHead)
      currentTail = nextStateTail
   }

   return &startState, currentTail
}
The power of structure
Here, I hope it starts to become clear why we separate the compiling from the lexing and parsing stages. Once we have the structure of the expression, it’s much easier to decompose the compilation into leaf nodes, such as a single letter, and composing nodes which hold collections of other nodes. Once we have these two types, we can simply tell composing nodes how to group their children, and tell leaf nodes the expected compiled form.
Having this separation of concerns will make life a lot easier for use when we introduce more complicated structures.
Changing our tests
Before we get ahead of ourselves, let’s modify our tests to use our new lexer, parser, and compile methods to generate our FSM, instead of using the hand-made FSM from our previous tests.
@@ // parser_test.go

- func TestHandmadeFSM(t *testing.T) {
+ func TestCompiledFSM(t *testing.T) {
-  // handMade
-  startState := State{}
-  stateA := State{}
-  stateB := State{}
-  stateC := State{}
-
-  startState.transitions = append(startState.transitions, Transition{
-          to:        &stateA,
-          predicate: func(input rune) bool { return input == 'a' },
-  })
-
-  stateA.transitions = append(stateA.transitions, Transition{
-          to:        &stateB,
-          predicate: func(input rune) bool { return input == 'b' },
-  })
-
-  stateB.transitions = append(stateB.transitions, Transition{
-          to:        &stateC,
-          predicate: func(input rune) bool { return input == 'c' },
-  })
+  // compiled
+  tokens := lex("abc")
+  parser := NewParser(tokens)
+  ast := parser.Parse()
+  startState, _ := ast.compile()

   type test struct {
      name           string
      input          string
      expectedStatus Status
   }

   tests := []test{
      {"empty string", "", Normal},
      {"non matching string", "xxx", Fail},
      {"matching string", "abc", Success},
      {"partial matching string", "ab", Normal},
   }

   for _, tt := range tests {
      t.Run(tt.name, func(t *testing.T) {
-        runner := NewRunner(&startState)
+        runner := NewRunner(startState)

         for _, character := range tt.input {
            runner.Next(character)
         }

         result := runner.GetStatus()
         if tt.expectedStatus != result {
            t.Fatalf("Expected FSM to have final state of '%v', got '%v'", tt.expectedStatus, result)
         }
      })
   }
}
And with that, our tests should be green!
We’ve now created a fully compiled - although very limited - state machine. Congrats!
Check out this part of the project on GitHub here
While the delete step is not strictly necessary, it does mean that unused links between states are removed and that gos garbage collector will have an easier time removing unused objects from memory. ↩︎
Previous: 02 Getting into some code